main.xml file (located in the res/layout folder) containing a <TextView> element:<?xml version="1.0" encoding="utf-8"?> <LinearLayout xmlns:android="http://schemas.android.com/apk/res/android" android:orientation="vertical" android:layout_width="fill_parent" android:layout_height="fill_parent" > <TextView android:layout_width="fill_parent" android:layout_height="wrap_content" android:text="@string/hello" /> </LinearLayout>
TextView view is used to display text to the user. This is the most basic view that you will definitely come across when you develop Android applications. If you need to allow users to edit the text displayed, you should use the subclass of TextView - EditText, which is discussed in the next section.Button, ImageButton, EditText, CheckBox, ToggleButton, RadioButton, and RadioGroup ViewsBesides the
TextView view, which you will come across the most often, there are some other basic controls that you will find yourself using very often. They are: Button, ImageButton, EditText, CheckBox, ToggleButton, RadioButton, and RadioGroup.First, add a new file to the
res/layout folder and name it as basicviews.xml. Populate it with the following elements:<?xml version="1.0" encoding="utf-8"?> <LinearLayout xmlns:android="http://schemas.android.com/apk/res/android" android:orientation="vertical" android:layout_width="fill_parent" android:layout_height="fill_parent" > <Button android:id="@+id/btnSave" android:layout_width="fill_parent" android:layout_height="wrap_content" android:text="Save" /> <Button android:id="@+id/btnOpen" android:layout_width="wrap_content" android:layout_height="wrap_content" android:text="Open" /> <ImageButton android:id="@+id/btnImg1" android:layout_width="fill_parent" android:layout_height="wrap_content" android:src="@drawable/icon" /> <EditText android:id="@+id/txtName" android:layout_width="fill_parent" android:layout_height="wrap_content" /> <CheckBox android:id="@+id/chkAutosave" android:layout_width="fill_parent" android:layout_height="wrap_content" android:text="Autosave" /> <CheckBox android:id="@+id/star" style="?android:attr/starStyle" android:layout_width="wrap_content" android:layout_height="wrap_content" /> <RadioGroup android:id="@+id/rdbGp1" android:layout_width="fill_parent" android:layout_height="wrap_content" android:orientation="vertical" > <RadioButton android:id="@+id/rdb1" android:layout_width="fill_parent" android:layout_height="wrap_content" android:text="Option 1" /> <RadioButton android:id="@+id/rdb2" android:layout_width="fill_parent" android:layout_height="wrap_content" android:text="Option 2" /> </RadioGroup> <ToggleButton android:id="@+id/toggle1" android:layout_width="wrap_content" android:layout_height="wrap_content" /> </LinearLayout>
The above XML file contains the following views:
- Button - represents a push-button widget
- ImageButton - similar to the Button view, except that it also displays an image
- EditText - a subclass of the TextView view, except that it allows users to edit its text content
- CheckBox - a special type of button that has two states - checked or unchecked
- RadioGroup and RadioButton - the RadioButton has two states - either checked or unchecked. Once a RadioButton is checked, it cannot be unchecked. A RadioGroup is used to group together one or more RadioButton views, thereby allowing only one RadioButton to be checked within the RadioGroup
- ToggleButton - displays checked/unchecked states using a light indicator
CheckBox, RadioButton, and ToggleButton views in their checked state.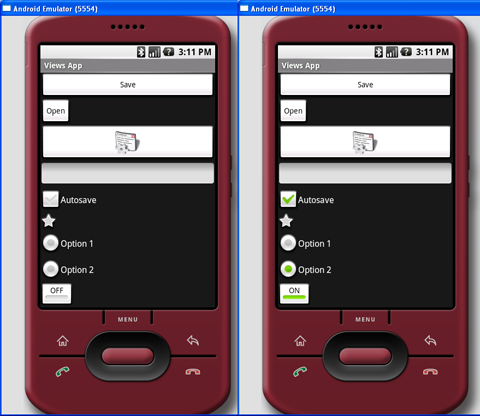
Figure 2 Various views in their various states
src/net.learn2develop.AndroidViews folder and name it as BasicViewsExample.java. Code its content as follows:package net.learn2develop.AndroidViews; import android.app.Activity; import android.os.Bundle; import android.view.View; import android.widget.Button; import android.widget.CheckBox; import android.widget.RadioGroup; import android.widget.Toast; import android.widget.ToggleButton; import android.widget.RadioGroup.OnCheckedChangeListener; public class BasicViewsExample extends Activity { @Override public void onCreate(Bundle savedInstanceState) { super.onCreate(savedInstanceState); setContentView(R.layout.basicviews); //---Button view--- Button btnOpen = (Button) findViewById(R.id.btnOpen); btnOpen.setOnClickListener(new View.OnClickListener() { public void onClick(View v) { Toast.makeText(getBaseContext(), "You have clicked the Open button", Toast.LENGTH_SHORT).show(); } }); Button btnSave = (Button) findViewById(R.id.btnSave); btnSave.setOnClickListener(new View.OnClickListener() { public void onClick(View v) { DisplayToast("You have clicked the Save button"); } }); //---CheckBox--- CheckBox checkBox = (CheckBox) findViewById(R.id.chkAutosave); checkBox.setOnClickListener(new View.OnClickListener() { public void onClick(View v) { if (((CheckBox)v).isChecked()) DisplayToast("CheckBox is checked"); else DisplayToast("CheckBox is unchecked"); } }); //---RadioButton--- RadioGroup radioGroup = (RadioGroup) findViewById(R.id.rdbGp1); radioGroup.setOnCheckedChangeListener(new OnCheckedChangeListener() { public void onCheckedChanged(RadioGroup group, int checkedId) { //---displays the ID of the RadioButton that is checked--- DisplayToast(Integer.toString(checkedId)); } }); //---ToggleButton--- ToggleButton toggleButton = (ToggleButton) findViewById(R.id.toggle1); toggleButton.setOnClickListener(new View.OnClickListener() { public void onClick(View v) { if (((ToggleButton)v).isChecked()) DisplayToast("Toggle button is On"); else DisplayToast("Toggle button is Off"); } }); } private void DisplayToast(String msg) { Toast.makeText(getBaseContext(), msg, Toast.LENGTH_SHORT).show(); } }
Toast class) when the various controls are clicked.Add the following lines in bold to the
AndroidManifest.xml file to register the new BasicViewsExample activity:<?xml version="1.0" encoding="utf-8"?> <manifest xmlns:android="http://schemas.android.com/apk/res/android" package="net.learn2develop.AndroidViews" android:versionCode="1" android:versionName="1.0.0"> <application android:icon="@drawable/icon" android:label="@string/app_name"> <activity android:name=".ViewsActivity" android:label="@string/app_name"> <intent-filter> <action android:name="android.intent.action.MAIN" /> <category android:name="android.intent.category.LAUNCHER" /> </intent-filter> </activity> <activity android:name=".BasicViewsExample" android:label="@string/app_name" /> </application> </manifest>
BasicViewsExample activity, insert the following statements in bold in the ViewsActivity.java file:package net.learn2develop.AndroidViews; import android.app.Activity; import android.content.Intent; import android.os.Bundle; public class ViewsActivity extends Activity { /** Called when the activity is first created. */ @Override public void onCreate(Bundle savedInstanceState) { super.onCreate(savedInstanceState); setContentView(R.layout.main); //---load the BasicViewsExample activity--- startActivity(new Intent(this, BasicViewsExample.class)); } }
F11 to debug the application on the Android emulator. Figure 3 shows the message displayed when the ToggleButton is clicked. 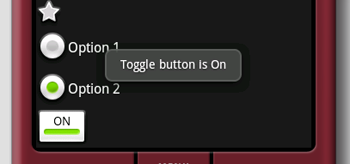
Figure 3 Message displayed when ToggleButton is clicked
EditText view, you can also set it to accept passwords by replacing each character with a ".". This is done using the password attribute: <EditText android:id="@+id/txtName"
android:layout_width="fill_parent"
android:layout_height="wrap_content"
android:password = "true"
/>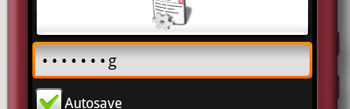
Figure 4 With
android:password attribute set to true