* TimePicker view
* DatePicker view
* ListView view
* Spinner view
* Gallery view
* ImageView
* ImageSwitcher view
* GridView view
Selecting date and time is one of the very common tasks you need to perform in a mobile application. Android supports this functionality through the TimePicker and DatePicker views.
TimePicker View
The TimePicker view allows users to select a time of the day, in either 24 hour mode or AM/PM mode.Add a new file to the res/layout folder and name it as datetimepicker.xml and populate it with the following element:
<?xml version="1.0" encoding="utf-8"?>
<LinearLayout xmlns:android="http://schemas.android.com/apk/res/android"
    android:orientation="vertical"
    android:layout_width="fill_parent"
    android:layout_height="fill_parent"
    >

    <TimePicker
        android:layout_width="wrap_content"
        android:layout_height="wrap_content" />

</LinearLayout>
package net.learn2develop.AndroidViews;

import android.app.Activity;
import android.os.Bundle;

public class DateTimePickerExample extends Activity
{
    @Override
    protected void onCreate(Bundle savedInstanceState)
    {
        super.onCreate(savedInstanceState);
        setContentView(R.layout.datetimepicker);
    }
}
<?xml version="1.0" encoding="utf-8"?>
<manifest xmlns:android="http://schemas.android.com/apk/res/android"
      package="net.learn2develop.AndroidViews"
      android:versionCode="1"
      android:versionName="1.0.0">
    <application android:icon="@drawable/icon" android:label="@string/app_name">

        <activity android:name=".ViewsActivity"
                  android:label="@string/app_name">
            <intent-filter>
                <action android:name="android.intent.action.MAIN" />
                <category android:name="android.intent.category.LAUNCHER" />
            </intent-filter>
        </activity>

        <activity android:name=".DateTimePickerExample"
                  android:label="@string/app_name" />

    </application>
</manifest>
package net.learn2develop.AndroidViews;

import android.app.Activity;
import android.content.Intent;
import android.os.Bundle;

public class ViewsActivity extends Activity
{
    /** Called when the activity is first created. */
    @Override
    public void onCreate(Bundle savedInstanceState)
    {
        super.onCreate(savedInstanceState);
        setContentView(R.layout.main);

        startActivity(new Intent(this, DateTimePickerExample.class));

    }
}
F11 to debug the application on the Android emulator. Figure 1 shows the TimePicker view in action. You can use the numeric keypad on the device to change the hour and minute and click on the AM button to toggle between AM and PM.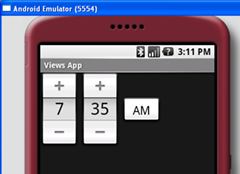
Figure 1: The TimePicker view in action