<?xml version="1.0" encoding="utf-8"?>
<LinearLayout xmlns:android="http://schemas.android.com/apk/res/android"
    android:orientation="vertical"
    android:layout_width="fill_parent"
    android:layout_height="fill_parent"
    >

    <DatePicker
        android:layout_width="wrap_content"
        android:layout_height="wrap_content" />

</LinearLayout>
@Override
    protected void onCreate(Bundle savedInstanceState)
    {
         super.onCreate(savedInstanceState);
         setContentView(R.layout.datetimepicker);
         //---remove this line---
         //showDialog(TIME_DIALOG_ID);
    }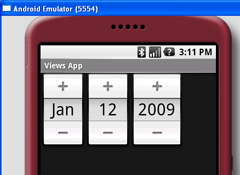
Figure 3: The DatePicker view in action
Displaying the DatePicker View in a Dialog Window
You can also display the DatePicker view in a dialog. Modify the DateTimePickerExample.java file as shown below:package net.learn2develop.AndroidViews; import android.app.Activity; import android.app.DatePickerDialog; import android.app.Dialog; import android.app.TimePickerDialog; import android.os.Bundle; import android.widget.DatePicker; import android.widget.TimePicker; import android.widget.Toast; public class DateTimePickerExample extends Activity { int hour, minute; int Year, month, day; static final int TIME_DIALOG_ID = 0; static final int DATE_DIALOG_ID = 1; @Override protected void onCreate(Bundle savedInstanceState) { super.onCreate(savedInstanceState); setContentView(R.layout.datetimepicker); showDialog(DATE_DIALOG_ID); } @Override protected Dialog onCreateDialog(int id) { switch (id) { case TIME_DIALOG_ID: return new TimePickerDialog( this, mTimeSetListener, hour, minute, false); case DATE_DIALOG_ID: return new DatePickerDialog( this, mDateSetListener, Year, month, day); } return null; } private TimePickerDialog.OnTimeSetListener mTimeSetListener = new TimePickerDialog.OnTimeSetListener() { //... }; private DatePickerDialog.OnDateSetListener mDateSetListener = new DatePickerDialog.OnDateSetListener() { public void onDateSet(DatePicker view, int year, int monthOfYear, int dayOfMonth) { Year = year; month = monthOfYear; day = dayOfMonth; Toast.makeText(getBaseContext(), "You have selected : " + (month + 1) + "/" + day + "/" + Year, Toast.LENGTH_SHORT).show(); } }; }
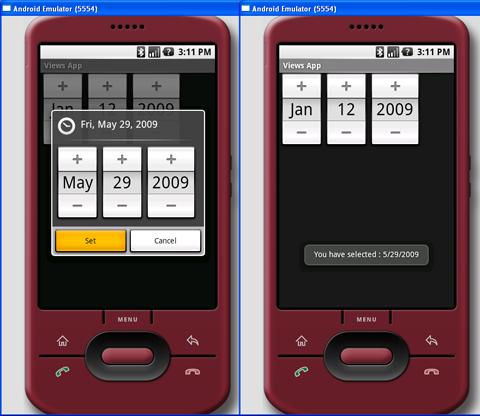
Figure 4: The DatePickerDialog in action